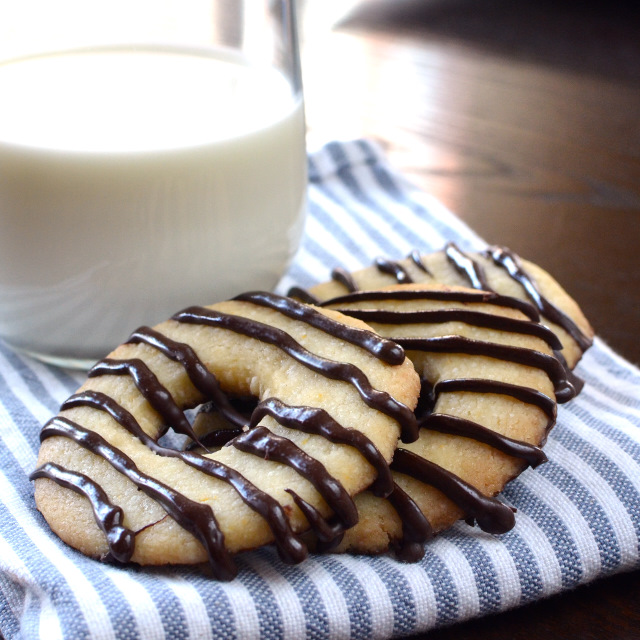
I am one of the co-presidents of my sons’ school PTA and I bring cookies to each of our Executive Board meetings. This time, I brought unfinished cookies. I started to make these cookies too late in the afternoon (the story of my life!), so I only had time to dip the bottoms in chocolate. I didn’t have time to put the chocolate stripes on the top. I barely let the bottom layer of chocolate firm up before I tossed them in a basket to bring to my meeting. Despite the fact that I served naked cookies with soft chocolate on the bottom, I received great feedback about them and they disappeared before the night was over.
Now let me warn you, these take a bit of time to make. They’re not nearly as quick as drop cookies. You have to make the dough, let it chill, roll it out, cut it out, bake it, let it cool, melt or temper the chocolate, dip the bottoms of the cookies, let them chill to harden the chocolate, then finally put the stripes on top. Lots of steps! In order to make these, you also need a candy thermometer (if you want to temper your chocolate), a food processor, a round cookie cutter with a 3″ diameter, and a small cookie cutter with a 1″ diameter (not having a cookie cutter this small, I actually used the wide end of a pastry bag tip to make the center holes in the cookies.)
I have read a lot about tempering chocolate, but had never tried it until this recipe. Tempering chocolate will leave it with a smooth, glossy finish and it will make it harden at room temperature so there’s a nice snap when it’s broken. Prior to making these cookies, I was always afraid of trying to temper chocolate, but I found a set of instruction that make it very easy, and the result was perfect. Once these cookies were fully cooled, they had a nice finish and the chocolate was indeed nice and hard at room temperature, without melting all over your fingers. Here are the instructions that I followed for tempering my chocolate. I highly recommend trying it. I used a big block of dark chocolate from Trader Joe’s (the pound plus bar) for these cookies. On my first try, I attempted to temper a mixture of bittersweet chocolate and milk chocolate. Bad idea. I ended up with a big mess of chocolate that didn’t melt properly. I’d stick to one type of chocolate when tempering.
I was hesitant about adding the orange zest to the cookies, but I’m glad I did. The orange flavor did not overwhelm the shortbread, it simply provided a bit of depth to the flavor of the cookies. These cookies were a big hit in my house. I’ll definitely make them again.
Fudge-Striped Shortbread Cookies
Recipe adapted slightly from Sugar HeroZest of 1 orange
3.5 oz (1/2 cup) granulated sugar
11.25 oz (2.5 cups) all-purpose flour
Pinch salt
10 oz cold, salted butter (~2.5 sticks), cubed
1 pound dark chocolatePut the orange zest and the sugar into a small bowl and rub the orange zest into the sugar with your fingers until the sugar is moist and fragrant.
Put the sugar, flour and salt into the bowl of a large (10-14 cup) food processor. Pulse to combine. Add the cubed butter and pulse until the dough begins to clump together. Once it comes together, turn it out of the bowl and knead it into a ball. Divide the dough in half and roll it out between two sheets of parchment paper until it’s 1/4″ thick. Chill in the refrigerator until the dough is firm. This should take about 20 minutes.
Preheat your oven to 350 F. Remove one sheet of dough from the refrigerator, put it on a cookie sheet and cut out 3-inch circles. Use your 1-inch cookie cutter (or the large end of a pastry bag tip) to cut circles in the center of the cookies. You might have to wait until the dough is slightly soft to cut the center circles, or the outer circles may crack. You can re-roll the scraps to create more cookies. Continue rolling and cutting until all of the dough is used. You should end up with approximately 30-32 circular cookies. Your dough should still be nice and cold when you bake the cookies. If not, chill them again for a few minutes by putting the cookie sheet directly into the refrigerator. Once chilled, bake them for 10-12 minutes until the edges start to turn light brown. Cool the cookies completely on the baking sheets before carefully removing them.
Melt the chocolate. I recommend tempering the chocolate. You can find directions for tempering chocolate here. Once the chocolate is melted, dip the bottom of each cookie into the chocolate, then place it chocolate-side down on the same parchment-lined baking sheet. Once all of the cookies are dipped, refrigerate the tray to set the chocolate. You can also put the cookie sheets into the freezer to speed up the process. Transfer the rest of the melted chocolate to a plastic bag with a very small hole snipped in the corner, and drizzle lines of chocolate over the tops of the cookies. Refrigerate once more to set the chocolate. If you don’t temper your chocolate, I recommend storing these cookies in the refrigerator.
Yield: ~30 cookies
One year ago:Texas Sheet Cake
Two years ago:Chock-Full-of-Chips Drops
Three years ago: Chocolate Sheet Cake with Delicious Vanilla Frosting
Four years ago:Pasta and White Beans with Broccoli Pesto
Five years ago:Carrot-Coconut Milk Soup
Six years ago:Mexican-Style Slaw with Jícama, Cilantro and Lime
Seven years ago:Vanilla Brown Sugar Breakfast Polenta
Eight years ago:Chick Pea Soup
 Print This Recipe


