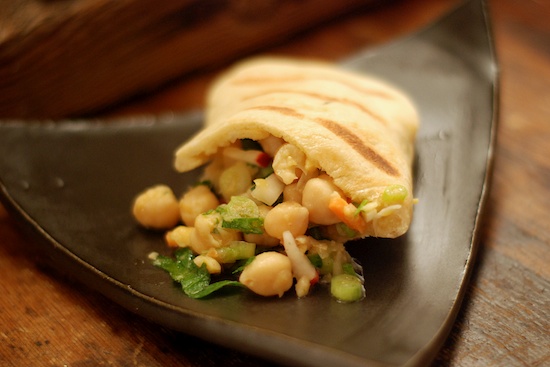
Ok, this is always what happens when I make something that’s really good, and I want to post it on the blog before we devour it… the photo’s not so great. I made this the other night – both the salad and the pita bread, and I thought both were really delicious, especially when you put the salad into the pita. When there was one small, misshapen pita left, I asked my husband to quickly photograph it. Photos are never great when they’re taken at night using the ambient light from the room. Photos are much better when taken during the day in natural sunlight.
My sister Lauren sent these recipes to me. I would never have tried to make the salad without a recommendation because I’m not a huge fan of radishes, but in this recipe they just give the salad a nice crunch. You don’t really taste them with all of the other flavors mixed in. I have some radishes left over, so I’m going to make this salad again tonight. I’ll make the pitas as well because they were really easy and the boys devoured them.
If you’re going to make the pita bread just in time for a meal, make sure you read all of the directions because the dough takes some time to rise. You should start to make them a couple of hours before you intend to eat them.
Do you think the boys liked the salad? Of course not. I got three of them to try a single chick pea. The first one swallowed it whole so he didn’t have to taste it. One bit into it and almost gagged and the other gave it a double thumbs down. The fourth one wouldn’t try it at all and decided he’d go without dessert so he didn’t have to taste it. Unbelievable. Please tell me that one day this is all going to change and they’ll start to eat more than peanut butter sandwiches and pasta with butter.
I served this with a side of avocado and corn gazpacho which I thought was terribly bland so I won’t be posting the recipe. It was very healthy, but without much taste.
I really must work on a new photo because these are two of my favorite new recipes of the summer.
NB: (8/8/11) I made the pitas and salad again tonight. Both were delicious. I didn’t have parsley so I made the salad with cilantro instead. I loved both versions, but I think I slightly prefer it with cilantro (I’m a huge cilantro fan!)
Chickpea, Carrot and Parsley Salad
Recipe from FineCooking.com19-oz. can chickpeas, drained and rinsed (about 2 cups)
1 cup loosely packed fresh flat-leaf parsley leaves, very coarsely chopped
1 cup loosely packed shredded carrot (from about 1 large carrot)
1/2 cup sliced radishes (about 6 medium)
1/2 cup chopped scallions, white and green parts (about 4)
3 Tbs. fresh lemon juice
1 tsp. ground coriander
Kosher salt and freshly ground black pepper
6 Tbs. extra-virgin olive oil
1/3 cup crumbled feta cheese or toasted pine nuts (optional)Put 1/2 cup of the chickpeas in a mixing bowl and mash them into a coarse paste with a potato masher or large wooden spoon. Toss in the remaining chickpeas along with the parsley, carrot, radishes, and scallions. Stir to combine.
In a liquid measuring cup, whisk together the lemon juice, coriander, 1/2 tsp. salt, and a few generous grinds of black pepper. Continue whisking while adding the olive oil in a slow stream. Pour over the salad and toss gently. Season the salad with salt and pepper to taste. Top with the feta or pine nuts, if using, and serve immediately.
Yield: 4 – 6 servings
Grilled Pita Bread
Recipe from FineCooking.com1 Tbs. honey
2 tsp. active dry yeast
15-3/4 oz. (3-1/2 cups) unbleached all-purpose flour; more as needed
2-1/2 oz. (1/2 cup) whole-wheat flour
1-1/2 tsp. kosher salt
2 Tbs. olive oil; more for the bowlIn a small bowl, mix the honey with 1/2 cup lukewarm water and stir in the yeast. Let sit until the yeast has started to foam, 2 to 3 minutes.
Put both flours and the salt in the bowl of a stand mixer fitted with the dough hook. With the mixer running on low speed, mix in the olive oil until fully incorporated, about 2 minutes. Add the yeast mixture and 1 cup lukewarm water and mix until fully incorporated, 2 to 3 minutes more. Raise the speed to medium and knead the dough until it comes away from the sides of the bowl and forms a ball that is smooth, elastic, and no longer sticky, 4 to 5 minutes. If the dough seems too wet, add more all-purpose flour, 1 tsp. at a time. Raise the speed to medium high and continue to knead for 5 minutes. Oil a medium bowl, transfer the dough to the bowl, and roll to coat it with the oil. Cover with plastic wrap and let rise in a warm place until doubled in size, about 1 hour.
Turn the dough onto a lightly floured surface and knead two or three times to remove any air bubbles. Form into a log and divide it evenly into 10 pieces. Form each piece into a ball and then roll into disks about 1/4 inch thick and 6 inches in diameter. Lightly oil two rimmed baking sheets. Put the disks on the baking sheets, cover with plastic wrap, and let rise until just doubled in thickness, 30 to 45 minutes.
Prepare a medium-high gas grill fire, leaving one burner off, or prepare a charcoal fire with a hot zone and cool zone by pushing the coals to one side of the grill.
Brush a cast-iron griddle or skillet lightly with olive oil and put it on the grill over the cool zone. When very hot, cook the pitas in batches on the griddle until starting to brown, 2 to 3 minutes. Flip and continue cooking until lightly golden on the bottom and the pitas are cooked through, 2 to 3 minutes more. Cool on a wire rack. If stuffing, cut the pitas in half and carefully separate the layers with a fork.
Yield: 10 pitas
One year ago: Eggplant Gratin
Two years ago: Tart Lime Pops
Three years ago: Asian Style Three Bean Salad
 Print This Recipe


The salad looks yummm… And I love pita bread as well…
BTW i cant see the pita recipe – what am i doing wrong?
I dont know what i did but i can see it now!